Hot Water Tank Leaking: Urgent Troubleshooting Guide
Urgent guide to diagnosing and fixing a hot water tank leaking. Learn quick checks, safety steps, and when to call a pro. Heater Cost analysis informs your next move.

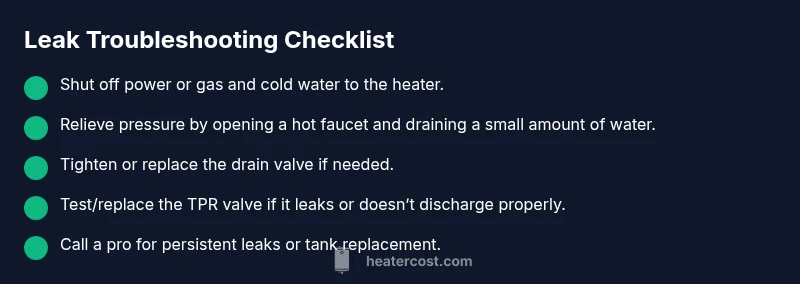
Most hot water tank leaks start at a simple point you can fix safely before replacing the unit. The culprit is often a loose drain valve, a faulty TPR valve, or a corroded tank. Before you do anything, shut off power or gas and stop the water supply, then drain a bit to clear pressure. If leaks persist, contact a licensed plumber.
Understanding the Risk of a Hot Water Tank Leaking
A hot water tank leaking is more than a nuisance: it can cause water damage, mold growth, elevated utility bills, and safety hazards from electrical or gas components. If you own or manage a property, act quickly but methodically to minimize damage. According to Heater Cost, prompt, correct identification of the leak source saves time and money while reducing risk. In most homes, stopping the flow and shutting down energy sources is the first, non-negotiable step to protect people and property. The Heater Cost team emphasizes that immediate safety must come before any inspection or repair work.
Key safety note: Keep children and pets away from the area. Avoid touching exposed wiring or damp electrical panels. If you smell gas or suspect a gas heater leak, evacuate and call emergency services right away.
Immediate Safety Actions You Should Take
When you notice a leak, your first moves should be safety-driven and decisive. Shut off the power to an electric heater at the breaker, or shut off the gas supply to a gas-fired unit. Turn off the cold water inlet to the tank to reduce pressure and slow the leak. If you can do so safely, open a nearby hot water tap to relieve pressure and help drain water away from the leak point. Place a bucket or towels to catch water, and keep a log of when you noticed the leak and any visible changes. By taking these steps, you reduce the risk of electrical shock, scald injury, and flood damage. The Heater Cost team recommends documenting the scene with photos for reference when consulting a professional.
Common Causes of Leaks (and How to Identify Them)
Leaks usually come from one of a handful of sources: a loose or damaged drain valve, a faulty temperature-pressure relief valve (TPR valve) or discharge line, worn inlet/outlet fittings, or a tank that has corroded or cracked with age. A quick tip is to observe whether water drips from the drain valve area or from pipes connected to the tank. If water puddles around the base, the tank shell itself may be the culprit. Remember: some leaks appear as condensation on the exterior and may not indicate a compromised tank. The Heater Cost analysis notes that visual inspection combined with a quick valve test often distinguishes these scenarios without costly tests.
How to Inspect Your System Without Making It Worse
Begin with the easiest checks: verify the drain valve is fully closed, inspect the discharge line for blockages, and feel around fittings for moisture. Use a flashlight to look for corrosion along the tank body and pipe joints. If you find an active leak at a fitting, you can sometimes tighten or reseal it with appropriate tools. Do not overtighten metal fittings, as that can crack seals. For the TPR valve, gently lift the test lever to ensure water is discharged through the safety line; if nothing comes out or water leaks from the valve itself, it’s time to replace the valve. Keep in mind that working on a hot water system can be dangerous; if you’re unsure, call a professional.
When to DIY vs When to Hire a Pro
Simple fixes, like tightening a drain valve or reseating a loose connection, can often be handled by a confident DIYer with basic tools. However, a leak from the tank shell, significant corrosion, or a faulty TPR valve that re-leaks after replacement typically requires a licensed plumber. If the tank is older than about 10-15 years, or if there is any sign of crystallized mineral buildup that affects performance, replacement may be the safer long-term option. The Heater Cost team recommends erring on the side of safety and scheduling a professional inspection when you’re unsure.
Maintenance Tips to Prevent Future Leaks
Routine maintenance is the best defense against unexpected leaks. Schedule annual inspections, drain and flush the tank to remove sediment, and replace the TPR valve every few years or as recommended by the manufacturer. Check insulation, especially in colder climates, to prevent condensation and freezing damage. If you have a pressure issue, consider installing a pressure regulator or expanding tank to stabilize system pressure. Regular checks of valves and fittings can catch small drips before they become large leaks.
Cost Considerations and Timing
Repair costs vary by source and extent of damage. A simple valve replacement is typically cheaper than replacing an entire tank, but an aged tank with corrosion may necessitate a full unit replacement. Because prices differ by region and by the type of heater (gas vs electric), it’s wise to obtain a few quotes and assess total cost of ownership, including potential water damage and energy efficiency changes after replacement. The Heater Cost analysis emphasizes balancing upfront costs with long-term reliability and safety.
Quick Troubleshooting Summary (What to Do Right Now)
- If you see a clear source like a drain valve, attempt a gentle reseal or valve replacement if you have the right tools.
- If the leak comes from the TPR valve or discharge line, replace the valve and ensure the discharge path is clear.
- If the tank body shows rust, bulging, or deep corrosion, plan for replacement and schedule a pro.
- Always prioritize safety: shut off power, water, and gas as appropriate, and contact a licensed plumber for persistent leaks.
Steps
Estimated time: 1-2 hours
- 1
Shut off power, gas, and water
Locate the main shutoffs for the heater. For electric units, switch off the breaker. For gas units, close the gas shutoff. Then close the cold water supply valve to stop incoming water.
Tip: Take a photo of valve positions before you start. - 2
Relieve pressure and drain a bit
Open a hot water faucet to relieve pressure in the tank. Place a bucket under the drain valve and open it slightly to drain a small amount of water; this reduces splash and makes inspection safer.
Tip: Only open the valve a little at first to control the flow. - 3
Inspect the drain valve and fittings
Tighten the drain valve gently with a wrench and check the threads. If leaks remain, replace the valve with a compatible one and re-test.
Tip: Use plumber’s tape on threaded connections if resealing. - 4
Test the TPR valve
Lift the TPR valve lever slightly to ensure water discharges through the discharge line. If nothing comes out or water leaks around the valve, replace the valve.
Tip: Do not bypass or block the discharge line. - 5
Inspect piping and connections
Check inlet/outlet fittings for moisture; tighten or reseal as needed. Look for worn gaskets or O-rings and replace if necessary.
Tip: Work gently to avoid cracking fittings. - 6
Decision point: repair or replace
If the tank shows visible corrosion, bulging, or multiple persistent leaks, plan for replacement rather than repair.
Tip: Consider energy efficiency and long-term reliability in your decision. - 7
Restore service and monitor
Close the drain, turn the water back on, then restore power or gas. Refill the tank completely and bleed air from the lines. Monitor for 24-48 hours.
Tip: Keep the area dry and watch closely for renewed leaks.
Diagnosis: Water leaking from hot water tank
Possible Causes
- highLoose or damaged drain valve
- mediumFaulty TPR valve or discharge line connections
- lowCracked, corroded, or aged tank
Fixes
- easyTighten or replace the drain valve; seal threads with appropriate plumber’s tape if needed and check for leaks after refilling.
- mediumInspect and replace the TPR valve if leaking or not discharging properly; ensure the discharge line is clear and properly routed.
- hardAssess tank condition; if corrosion or cracks are evident, plan for a full water heater replacement with a licensed professional.
Got Questions?
Can a leaking hot water tank be repaired?
It depends on the source of the leak. Leaks at valves or fittings are often repairable, but a tank with corrosion or cracks usually requires replacement.
Leaks from valves or fittings can often be fixed, but a cracked or corroded tank typically needs replacement.
Is it safe to continue using a water heater when leaking?
No. A leak can cause flooding, scalding risks, and electrical or gas hazards. Shut off power, water, and gas as applicable and contact a professional.
No, you should not continue using a leaking heater. Shut it off and call a professional.
How can I tell if the leak is from the drain valve or the tank itself?
If water appears at the drain area and stops after tightening, it’s likely the valve. If water continually drips from the shell, the tank is likely compromised.
Leaks at the drain valve usually stop after tightening; shell leaks mean tank issues.
What is the typical cost to fix a leaking water heater?
Costs vary widely based on the source and whether replacement is needed. Minor valve work is cheaper than full tank replacement, and labor costs vary by region.
Costs range depending on the issue, but valve work is cheaper than replacing the whole tank.
When should I replace a hot water tank instead of repair?
If the tank is old, heavily corroded, or has multiple recurrent leaks, replacement is usually the safer long-term option.
If the tank is old or heavily corroded, replacement is often the best choice.
Can environmental factors cause a leak?
Condensation around a cold climate can appear as a leak, but sustained water loss usually indicates a more serious issue inside or around the tank.
Moisture from condensation can look like a leak, but persistent water loss needs inspection.
Watch Video
The Essentials
- Act fast and stay safe: shut off power, water, and gas as applicable.
- Identify the leak source before attempting fixes.
- DIY fixes are appropriate for valve issues; tank replacement should be left to a pro when corrosion is present.
- Regular maintenance dramatically reduces the risk of future leaks.
- The Heater Cost team emphasizes safety and professional assessment when in doubt.