Water Heater Flush Service: Step-by-Step Maintenance Guide
Learn how to perform a water heater flush service safely, improve efficiency, and extend your heater’s life with our comprehensive, easy-to-follow guide backed by Heater Cost analysis.

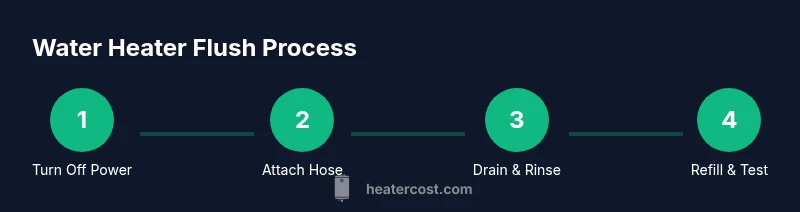
To perform a water heater flush service, gather a garden hose, a bucket, and basic hand tools, then shut off power and the cold-water supply. Attach the hose to the drain valve, open the valve, and allow the tank to drain. Rinse with clean water, refill, and restore power. Schedule annually for best efficiency and extend tank life.
What is a water heater flush service?
A water heater flush service is a maintenance task designed to remove mineral sediment from the bottom of a storage tank. Over months or years, minerals in your water can settle as a gritty layer that impedes heat transfer, reduces efficiency, and shortens the unit’s life. A flush typically involves draining some or all of the tank, flushing with clean water, and returning the tank to service. The goal is to restore proper water flow, prevent sediment buildup, and maintain consistent hot water delivery. While not every home requires a flush every year, homeowners in areas with hard mineral content or frequent use benefit most from a regular schedule. If your water heater makes rumbling noises, delivers lukewarm water, or runs longer than usual to maintain temperature, a flush can help identify and remedy the underlying sediment issues. Always consult your manufacturer’s recommendations, as some newer models are designed to be flushed with specific procedures or require professional service. A cautious, well-planned flush can be a straightforward DIY task for many tank-based systems, but it’s essential to recognize when to call a pro.
Benefits of regular flushing
Regular flushing dissolves and removes sediment that builds up over time. The practical benefits include improved heating efficiency, steadier hot water delivery, longer equipment life, and reduced likelihood of heater noises. By maintaining a cleaner heat exchanger, your system doesn’t have to work as hard to reach set temperatures, which can translate into measurable energy savings over the year. Flushing also helps prevent mineral buildup from restricting water flow, which can affect both recovery rates and overall output. While the exact savings depend on your water quality and usage, a disciplined maintenance schedule commonly yields noticeable improvements in comfort and reliability. Always document flushes as part of a home maintenance routine so you can track performance trends over time.
When to schedule a flush
Many homeowners flush their water heater annually, but frequency should adjust to local water quality and usage patterns. If you have hard water, a tank that has run for several years, or frequent hot water demands in your household, consider more frequent flushes. Signs that a flush is needed include longer recovery times, inconsistent hot water, sediment in the tank’s outlet water, or rumbling and popping noises during heating. If your unit is relatively new or you’ve recently installed a water-softening system, check the manufacturer’s guidelines, as some models require special procedures or have built-in self-cleaning features. Align flush timing with seasonal maintenance to avoid cold-water surprises during peak usage periods.
Tools, safety, and preparation
Before you begin, ensure you have the right tools and PPE, and that you understand basic safety steps. Protect floors and nearby surfaces with towels or a drop cloth. Wear gloves and safety goggles to guard against hot water and sharp edges. Turn off power at the breaker for electric heaters or set the gas control to the pilot/ OFF position for gas units, then close the cold-water supply to the heater. Attach a garden hose to the drain valve and position the other end to a safe drainage area. Finally, have a bucket handy for catching a small amount of residual water. If you feel unsure at any point, contact a licensed plumber. A careful, prepared approach reduces the risk of leaks or scalding and makes the procedure smoother.
What happens during a typical flush (high-level)
During a standard flush, you connect a hose to the drain valve, open the drain to let water flow out, and allow the tank to empty. The tank is then flushed with clean water to rinse loose sediment. Some technicians also perform a partial refill to agitate the sediment, then drain again before final refill. Finally, you close the drain, refill the tank, purge air from the lines, and restore power or gas to resume normal operation. This high-level overview gives you a sense of the sequence, but always follow manufacturer guidelines and local codes for your specific model.
Alternatives and common mistakes
For some homes, a simple drain-and-reflush is enough, while others may benefit from a more thorough approach called a power flush. Common mistakes include leaving the drain valve open too long, failing to vent air properly, or not shutting off power or gas before starting. Skipping the final purge of air can leave pockets in the system that feel like “no hot water.” If you have an older or compromised tank, or if the procedure seems intimidating, hiring a licensed plumber is a prudent option to ensure safety and proper disposal of wastewater.
Tools & Materials
- Garden hose (3/4 inch diameter)(Long enough to reach a nearby drain; ensure fittings compatible with the drain valve)
- Bucket(Catch residual water and freshwater during rinse)
- Adjustable wrench(Loosen drain valve fittings if needed)
- Flat-head screwdriver(Operate drain valve or shut-off components if required)
- Rags or towels(Cleanup and protect floor surfaces)
- Safety gloves(Protect hands from hot water and sharp edges)
- Safety goggles(Protect eyes from splashes)
- Teflon tape(Re-seal any drain fittings if replaced)
- Shut-off valve tool(To safely close the cold-water supply valve)
Steps
Estimated time: 45-60 minutes
- 1
Power down and isolate
Turn off the electrical power to the water heater at the circuit breaker (or switch off the gas supply and set the unit to pilot/off for gas heaters). Close the cold-water supply valve to stop incoming water. This prevents backflow and protects you from energized components while you work.
Tip: Always verify power is off with a non-contact tester before touching any electrical components. - 2
Attach the hose to the drain valve
Place the bucket nearby, then attach the garden hose to the drain valve at the bottom of the tank. Ensure a snug fit to prevent leaks. Run the hose to a safe drainage path to avoid water damage.
Tip: If the valve is stiff, apply a small amount of penetrating oil and let it sit for a few minutes before attempting to loosen. - 3
Open the drain valve and start draining
Carefully open the drain valve to begin draining the tank. Let it run until the tank is nearly empty, allowing sediment to begin flushing out with the water. If water slows or stops, close and reopen to manage flow.
Tip: Do not force the valve open; sudden movement can damage fittings or create leaks. - 4
Flush with clean water
With the tank draining, briefly open and close the cold-water supply to flush sediments out through the hose. Repeat until the water runs clear and free of sediment. This helps ensure you’ve removed most of the accumulated debris.
Tip: Keep the bucket ready to catch any splashes and prevent mess. - 5
Refill and purge air
Close the drain valve, remove the hose, and begin refilling the tank with cold water. Once water starts exiting the drain line, close the drain and relieve any trapped air by briefly opening hot water taps at a sink until steady water flows.
Tip: Purge air only when you have a steady stream; otherwise water may spill or splash. - 6
Restore power and test
Turn power back on at the breaker (or re-engage the gas supply). Check that the heater lights or powers on, then run a faucet to confirm hot water is available. Monitor for leaks around fittings.
Tip: If you smell gas or detect a strong flame near the thermostat, turn off the unit and call a professional.
Got Questions?
What is a water heater flush service?
A flush removes sediment from the bottom of a storage tank to improve heat transfer and efficiency. It often involves draining, rinsing, and refilling the tank, then restoring power.
A flush removes sediment from the tank to improve efficiency. It includes draining, rinsing, and refilling the tank before turning the heater back on.
How often should I flush my water heater?
Most homes benefit from flushing annually, but frequency depends on water quality and usage. Hard water or heavy usage may require more frequent maintenance.
Most people flush once a year, but you may need to do it more often if your water is hard or you use a lot of hot water.
Can I flush a gas-powered water heater myself?
Yes, many homeowners perform a flush themselves if they follow safety steps. If you’re unsure about gas valves or venting, hire a licensed professional.
You can, but only if you’re comfortable with safety steps. If not sure, hire a pro.
What are common signs a flush is needed?
Sediment buildup, longer heating times, reduced hot water, or noises from the tank indicate flushing may be beneficial.
Look for sediment, noise, or slow heating as signs you should flush.
Is flushing the same as draining?
Draining is part of flushing. Flushing also includes rinsing and refilling to remove sediment from the system.
Draining is part of it, but flushing also rinses and refills the tank.
Should I hire a professional for a flush?
If you’re confident with basic plumbing and safety, you can DIY. For complex systems or high-risk setups, a licensed plumber is advised.
If you’re not comfortable, hire a pro.
Watch Video
The Essentials
- Schedule annual flushes for best efficiency
- Use proper safety gear and follow shutdown steps
- Flush removes sediment that reduces heat transfer
- Refill and purge air before restoring power