Replace Relief Valve Water Heater: Step-by-Step Guide
Learn how to safely replace the temperature and pressure relief valve on a residential water heater. This detailed guide covers safety, valve selection, installation, testing, and maintenance to prevent leaks, overpressure, and costly damage.

By replacing the water heater’s relief valve you restore essential protection against overpressure and leaks. This steps-focused guide covers valve selection, safety precautions, proper installation, and testing to ensure reliable operation. Follow these steps carefully and verify the valve seals and discharge path before returning the system to service. This guide emphasizes safety and local code compliance.
Understanding the relief valve on a water heater
The temperature and pressure relief valve (T&P valve) is a critical safety device built into virtually every residential water heater. It opens automatically when water pressure or temperature exceed safe limits, allowing hot water to vent to a safe location. This prevents the tank from rupturing and helps avert scald injuries. Over time, the valve seat can corrode, gasket material can degrade, and mineral buildup from hard water can hinder operation. When you notice frequent dripping, a sudden surge in water discharge, or the valve’s discharge line appears clogged or frozen, replacement becomes a prudent maintenance decision. Replacing the relief valve is not a cosmetic repair; it restores essential overpressure protection and keeps your system in code compliance. Before starting, confirm you have the correct valve for your make and model, and ensure the discharge path is clear and directed to a safe, non-freezing location.
Safety considerations before you start
This work involves hot water, pressurized systems, and potential gas or electrical hazards. Begin by turning off the power source (electric) or setting the water heater to pilot off and turning off the gas supply if you have a gas unit. Close the cold water supply valve to the tank, and open a hot faucet in the house to help relieve pressure. Do not attempt this with the tank full of hot water. Wear safety goggles and heat-resistant gloves, and keep a bucket and towels ready to catch any spilled water. If you smell gas, hear hissing, or see water pooling around fittings, stop and call a licensed plumber or the utility company.
Choosing the right relief valve for your heater
Most residential water heaters use a standard 3/4-inch NPT connection with a valve rated for 210°F and 150 psi, but check your tank label for exact specifications. Valves vary by outlet size, temperature setting, and pressure rating. When in doubt, bring the old valve to a plumbing supply shop to match the thread type and ensure the replacement is listed for potable water use. Do not reuse old sealing materials that are degraded.
Preparing the work area and securing the components
Set up the work area on a level surface with good lighting. Place a bucket under the valve to capture water during removal. Have towels or rags handy for spills. If your discharge line runs outdoors, ensure the outlet is safely directed away from doors, sidewalks, or electrical equipment. Keep pets and children away from the work zone. Inspect the discharge piping for damage and corrosion before installing the new valve.
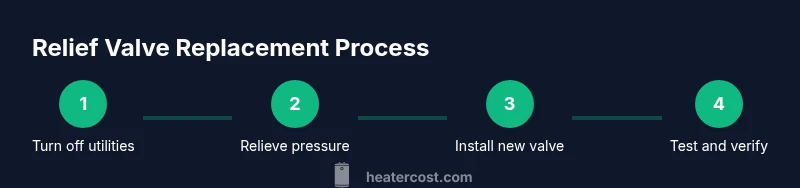
Replacement steps in brief (high-level overview)
Although the detailed steps are provided in the STEP-BY-STEP section, here is a brief high-level overview: you will (1) relieve pressure and drain a small amount of water, (2) disconnect the old relief valve, (3) prepare the new valve with thread sealant, (4) install the new valve and discharge pipe, (5) refill the tank and re-pressurize, (6) test the new valve and verify no leaks. This section is for context and should not substitute for the formal procedure in the steps block.
Common mistakes to avoid
Don't overtighten the valve; extreme torque can strip threads. Avoid using pipe dope on valve bodies where tape alone is recommended. Do not cap or block the relief outlet or vent. Ensure you direct the discharge line to a safe location; never terminate discharge into a wall cavity or a flood-prone area. Don’t work on the valve if you are unsure about gas or electrical connections.
After installation: testing and verification
Turn the water back on slowly and fill the tank fully. Restore power or gas and let the heater reach normal operating temperature. Lift the test lever on the valve to ensure water discharges through the outlet (do this carefully). Observe for leaks around the valve and threaded joints over the next 24 hours. If you notice leaks, tighten slightly or reseal with fresh Teflon tape and re-test.
Maintenance and prevention for the future
Schedule annual checks of the T&P valve, inspect discharge piping for damage, and replace the valve every 5-10 years or as recommended by the manufacturer. Test the valve monthly during the first year after installation when possible. Consider installing an expansion tank if your local code requires it or if you have frequent pressure fluctuations.
Final notes on compliance and safety
Local codes may require a permit or professional inspection for work on domestic water systems. Always verify that the valve you install complies with the manufacturer’s specifications and local code requirements. If any step feels uncertain, pause and contact a licensed plumber. Safety should be your top priority when replacing a relief valve water heater.
Tools & Materials
- New temperature and pressure (T&P) relief valve(Ensure correct rating for your tank (e.g., 210°F, 150 psi) and 3/4-inch NPT thread if standard.)
- Adjustable wrench(Use to loosen and tighten valve fittings without over-torquing.)
- Combination pliers(Helpful for gripping and positioning pipes during disassembly.)
- Pipe thread sealant tape (Teflon tape)(Wrap on male threads only; avoid getting tape on the valve seat surface.)
- Pipe dope (optional)(An alternative or supplement to tape on some connections.)
- Discharge tube (PVC/CPVC) and fittings(Directs drained water to a safe location with downward slope.)
- Bucket and towels(Catch water and keep the work area clean and slip-free.)
- Heat-resistant gloves(Protect hands when handling hot components.)
- Safety goggles(Protect eyes from splashing water and debris.)
Steps
Estimated time: 90-150 minutes
- 1
Turn off utilities and isolate the tank
Power down the heater at the breaker or thermostat, and shut off the gas valve if applicable. Close the cold-water supply valve to the tank and open a hot faucet to vent air. This prevents pressure buildup when you work on the valve.
Tip: Confirm the heater is cool to the touch to avoid burns. - 2
Relieve pressure and drain a small amount of water
Open the drain valve on the T&P or carefully pour water from the tank just enough to lower the level near the valve seating area. Do not drain the entire tank unless directed by a professional.
Tip: Keep a bucket under the valve to catch drips and protect flooring. - 3
Disconnect the old relief valve
With the tank depressurized, loosen the old valve with an adjustable wrench. Do not force if threads resist; check for cross-threading or corrosion and address before continuing.
Tip: Take a quick photo of the current configuration for reference. - 4
Prepare the new valve
Wrap the male threads of the new valve with Teflon tape in the direction of tightening. Do not tape the valve seat; ensure the end that threads into the tank is clean and free of debris.
Tip: Apply tape evenly with several wraps; avoid over-taping which can affect seal integrity. - 5
Install the new valve and discharge pipe
Thread the new valve into the tank by hand first, then snug with a wrench. Attach the discharge piping with a downward slope to a safe drain, avoiding kinks or sharp bends.
Tip: Never over-tighten; excessive torque can damage the tank fittings. - 6
Rebuild and fill the tank
Close the drain valve, reopen the cold-water supply, and allow the tank to fill completely. Leave the hot faucet open initially to vent air until steady water runs clean.
Tip: Filling gradually prevents shock to the valve and fittings. - 7
Restore power or gas and test the valve
Turn the power back on or re-light the pilot and bring the heater to normal operating temperature. Lift the test lever on the valve to confirm discharge occurs through the outlet.
Tip: Do this slowly and keep hands clear of the discharge path. - 8
Check for leaks and finalize
Inspect all connections around the valve and discharge piping for moisture. If any leaks are found, re-torque fittings or reseal with fresh tape and retest.
Tip: Monitor the area for the first 24 hours after replacement.
Got Questions?
Can I replace a water heater relief valve myself?
Yes for many homeowners with basic plumbing skills, provided you can safely shut off utilities and drain the tank. If you encounter gas, electrical, or difficult access, hire a licensed plumber.
Yes, if you’re comfortable with basic plumbing and safety steps. Call a pro if you encounter gas or electrical concerns.
What tools do I need to replace a relief valve?
Common tools include an adjustable wrench, pliers, Teflon tape, a bucket, towels, and a discharge tube. Always use safety gear like goggles and gloves.
You’ll need a wrench, tape, a bucket, towels, and a discharge tube; safety gear is essential.
How do I know which relief valve to buy?
Check your tank’s label for the correct size (often 3/4-inch NPT) and the required temperature/pressure rating (commonly 210°F and 150 psi). Match the threads and potable water rating.
Look for the exact size and rating on the tank label to ensure compatibility.
What are signs the relief valve is failing?
Visible leaks, frequent dripping, or steam and moisture around fittings indicate a failing valve. If the valve does not reseal after testing, replace it.
Leaks, drips, or steam by the valve signal a problem; replace the valve if it won’t reseal.
Do I need to drain the entire tank to replace the valve?
Not usually. Drain only enough water to relieve pressure and access the valve, then refill and test. Draining the entire tank is generally unnecessary unless directed by a professional.
Usually just drain a portion to access the valve; full drainage is rarely required.
Is a permit required for replacing a relief valve?
Permit requirements vary by location. Check with your local building department. In most cases, replacing a valve is a home maintenance task, but local rules may apply.
Check local codes; permits vary by area, but this task is often treated as maintenance.
Watch Video
The Essentials
- Turn off all utilities and depressurize first.
- Use the correct valve size and rating for your heater.
- Replace with careful sealing and proper discharge routing.
- Test for leaks and re-test after full re-pressurization.
- Consult a professional if any doubt arises.