Gas Heater Repair: A Practical Homeowner's Guide
Learn how to diagnose and safely repair common gas heater issues with practical guidance from Heater Cost. Understand risks, maintenance, and when to call a pro.

You can safely diagnose and perform basic gas heater repairs by checking the thermostat, pilot light safety, and venting. This guide covers essential safety steps, common problems, and when to call a professional. For complex issues, prioritize professional service to protect your home and avoid dangerous leaks. Keep a flashlight handy and never bypass safety controls.
Why Gas Heater Repair Matters
Gas heaters provide reliable warmth, but repairs carry safety implications. Gas leaks and carbon monoxide exposure are serious hazards that can result from neglected maintenance or incorrect DIY steps. This is why a thoughtful approach to gas heater repair matters for homeowners, renters, and property managers alike. According to Heater Cost, investing a little time in safety checks and routine maintenance can prevent costly breakdowns and ensure your system runs efficiently. In this guide, we explore how gas heaters work, what can go wrong, and how to address problems responsibly. We focus on practical, non-technical guidance you can act on today, while recognizing the limits of DIY work.
Understanding Your Gas Heater System
A gas heater is more than a burner: it comprises the heat exchanger, a gas control valve, an igniter or pilot, an exhaust vent, a thermostat, and safety devices like a carbon monoxide detector. Each component plays a role in producing heat, controlling flame, and venting combustion byproducts safely outside your home. Heater Cost analysis shows that problems often stem from improper venting, worn igniters, or thermostat malfunctions, which can lead to inefficient operation or safety risks. By recognizing how the system fits together, you can identify the most likely failure points without disassembling critical parts. Remember that many symptoms—such as uneven heat, short cycling, or a flickering flame—do not point to a single faulty part. They indicate a system-level issue that may require coordinated checks across components. A solid understanding of the architecture helps you communicate clearly with technicians and prepare for a service visit.
Safety First: CO, Gas Leaks, and Venting
Working with gas appliances requires respect for safety rules. The most dangerous risks come from gas leaks and carbon monoxide, which is odorless and colorless. Install and maintain a working CO detector on every level and test it monthly. Ensure you have an accessible shut-off valve and know how to shut off gas supply in an emergency. Venting must be clear of obstructions; blocked vents can force combustion byproducts back into living spaces. If you ever smell gas, hear hissing sounds, or see black soot around vents, evacuate immediately and call emergency services. These precautions form the foundation of any gas heater repair plan and save lives by reducing exposure to toxic gases.
Common Problems and Diagnostics
Typical issues include ignition problems, flame failure, dirty burners, and vent restrictions. Ignition problems can show as failure to light, repeated attempts to ignite, or a loud click without combustion. Burners may accumulate dirt or soot, leading to uneven heating and reduced efficiency. A dirty heat exchanger or clogged vent can cause overheating or backdrafts. Symptoms like unusual noises, frequent cycling, or rising energy bills should prompt a professional inspection. Where safe, you can perform basic checks: verify gas supply is on, inspect the thermocouple and igniter for wear, and ensure the flame stays blue with no yellow tint. Do not attempt to disassemble pressure vessels or sealed combustion chambers.
Tools, Materials, and Prep
Before you begin, gather the essential tools and supplies. A properly equipped homeowner will have a gas leak detector, an adjustable wrench, a set of screwdrivers (flathead and Phillips), a non-contact voltage tester or multimeter for controls, a CO detector (freshly tested), and soapy water for quick leak testing. Keep rags handy, a flashlight, and a clean workspace. Confirm you have shut-off valves accessible and know where the main power switch and gas shut-off are located. Having a camera or phone to document issues can help when you call a professional later, and a notepad for recording observations keeps your service appointment efficient.
Step-by-Step: Quick DIY Checks You Can Do
While major repairs require a licensed technician, you can perform several safe checks to narrow down symptoms and decide if service is needed. Start by turning off the system power and gas, then re-securing the connections after inspection. Check the thermostat settings to ensure the unit is commanded to heat and that the fan operates as expected. Inspect the ignition system and ensure the pilot light remains lit or the electronic igniter is sparking when heat is demanded. Look for vent obstructions and verify there is adequate clearances around the unit. Finally, test for leaks around fuel connections and CO presence with detectors. Record what you observe and avoid touching live electrical components. If anything seems unsafe, stop and call a professional.
When to Hire a Professional and How to Choose
Not all gas heater issues are safe or wise to fix yourself. If you detect a gas odor, CO alarm activation, major gas line work, or signs of persistent ignition failure, contact a licensed HVAC technician immediately. When selecting a pro, verify licenses and insurance, request written estimates, and ask about warranties and follow-up support. Communicate the symptoms you’ve observed, the age of the system, and any maintenance history. Ask about safety practices and whether the technician tests CO levels after service. A reputable pro will explain fixes in plain terms, provide a clear scope of work, and offer preventive maintenance advice tailored to your home.
Maintenance to Prevent Future Breakdowns
Regular maintenance is the best defense against unexpected failures and high energy costs. Schedule annual inspections, clean or replace filters as recommended by the manufacturer, and ensure the venting path remains clear. Keep detectors tested and replace batteries on schedule. Document thermostat settings and service dates to track the system’s health over time. By adopting a simple maintenance routine, you reduce the odds of sudden breakdowns and extend the life of your gas heater while keeping your home safer and more comfortable.
Tools & Materials
- Gas leak detector(Calibrated for home use)
- Adjustable wrench(At least 6–8 inches long)
- Screwdrivers (flathead and Phillips)(Phillips #2, flathead 1/4 inch)
- Multimeter(For electrical checks on controls)
- CO detector(Test before and after inspection)
- Soapy water solution(For quick leak testing on connections)
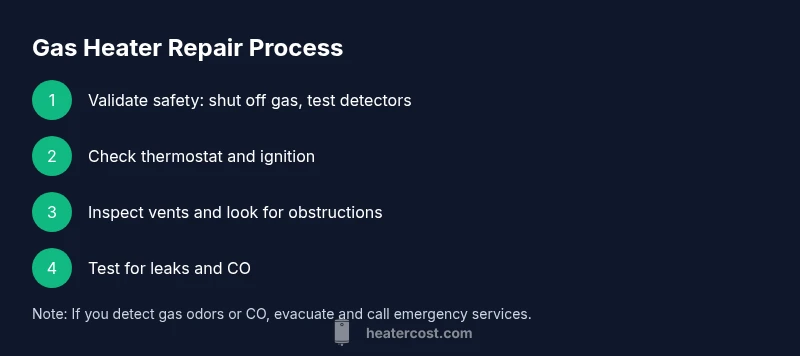
Steps
Estimated time: 60-90 minutes
- 1
Shut off gas and power
Shut down both the gas supply and electrical power to the unit before inspection. This reduces the risk of accidental ignition or electrical shock as you examine connections.
Tip: If you smell gas at any time, stop and evacuate immediately. - 2
Check thermostat and mode
Verify the thermostat is set to heat and at a reasonable setpoint. If the unit has a manual switch, ensure it is in the correct position and the fan is commanded to run when heat is needed.
Tip: If the thermostat is old or unresponsive, note it for replacement by a professional. - 3
Inspect ignition or pilot
Inspect the ignition source for a clean spark or flame and ensure the pilot remains lit (for older units). Do not touch burner components while powered.
Tip: Do not attempt to bypass safety controls or reignite a pilot if you’re unsure. - 4
Look for vent obstructions
Check that the vent and flue are clear of blockages such as debris or bird nests. Obstructions can cause backdrafts and unsafe buildup of combustion byproducts.
Tip: Use a flashlight to inspect the vent pipe from the exterior if accessible. - 5
Test for leaks and CO
Use a gas detector around fittings and connections and verify CO detectors function. If you detect a leak or CO, shut down and contact a professional immediately.
Tip: Keep detectors within their expiration window and test monthly. - 6
Document findings and plan next steps
Record symptoms observed, dates of inspections, and any parts touched. If problems persist or you feel unsafe, schedule a professional service with a detailed note.
Tip: Provide the tech with your findings to speed up diagnosis.
Got Questions?
Is it safe to DIY gas heater repair?
DIY gas heater work is risky due to gas leaks and carbon monoxide. Perform only basic checks described here and call a licensed pro for anything beyond that.
DIY safety risk: consult a licensed professional for complex repairs.
What are common signs my gas heater needs repair?
Look for reduced heat, strange noises, yellow flames, frequent cycling, or increasing energy bills. Any of these can indicate a problem that merits inspection.
Common signs include reduced heat, odd noises, and unusual flames.
Can I replace a thermostat myself?
Thermostat replacement is feasible for some systems if you follow the installation instructions and cut power. For integrated gas-control systems, hire a pro.
Thermostat replacement is possible for simple setups, but be cautious with gas-control units.
How long does a typical gas heater repair take?
Repair duration varies by issue; simple part replacements may take a few hours, while complex diagnostics can require a service visit.
Most repairs are completed within a few hours, depending on the problem.
Why should I schedule annual gas heater service?
Annual service helps catch wear, ensure venting is clear, and verify CO detectors are working, reducing the risk of breakdowns and safety hazards.
Annual service catches wear and safety issues early.
What maintenance can I do myself?
Basic tasks include changing filters, checking vents, testing CO detectors, and keeping the area around the unit clean and unobstructed.
You can do simple upkeep like filter checks and vent cleaning.
Watch Video
The Essentials
- Identify when DIY is appropriate and when to call a pro
- Prioritize safety: CO, gas leaks, and venting
- Maintain detectors and document findings
- Use proper tools and follow procedures
- Schedule annual inspections to prevent failures