How to Clean a Heater: Safety, Tools, and Step-by-Step Guide
Learn how to clean a heater safely and effectively. This guide covers space heaters and central systems, with practical steps, safety tips, and a maintenance plan to keep your home warm and efficient.

Learn how to clean your heater safely and effectively, whether you own a space heater or a central system. This quick guide outlines essential safety steps, the tools you need, and a clear step-by-step approach to remove dust, improve airflow, and maintain reliable heating. It covers exterior cleaning, basic interior access for safe exterior parts, and when to call a professional. Unplug before you start and follow local safety guidelines.
Why a clean heater matters for safety, efficiency, and comfort
A clean heater operates more safely, uses energy more efficiently, and provides steadier heat. When dust and debris build up on vents, grills, and internal fans, airflow is restricted, which can strain motors, trip safety switches, and reduce heating effectiveness. For homeowners, a neglected heater can also become a source of allergens or odors. Keeping your heater clean is a straightforward maintenance task that pays dividends in comfort and energy bills.
According to Heater Cost, regular cleaning can improve heater efficiency, prolong lifespan, and reduce energy waste. The team notes that even small accumulations of dust on elements like fans, grills, and flame sensors for gas models can impair performance and safety. The goal is to remove loose dust, prevent moisture buildup, and protect sensitive components from corrosion. Before you start, clear the area around the heater, unplug it if it is portable, and verify there are no exposed wires. This early preparation helps prevent accidents and ensures you can reach every surface.
In this guide, you will learn how to approach cleaning with a safety first mindset, what tools you will need, and how to tailor your method to the type of heater you own. We will cover space heaters, central heating systems, and water heaters where applicable, with clear warnings where professional service is recommended. As you read, consider how routine cleaning can fit into your seasonal maintenance calendar.
Brand context note: Regular maintenance is a practical step homeowners can take to protect safety and comfort, while keeping energy costs in check.
Understanding different heater types and how cleaning differs
Heaters come in several forms and cleaning needs differ accordingly. A portable space heater is designed for quick, surface level care and should be cleaned only on the outside with dry or barely damp cloths. A central furnace or boiler has moving parts inside a sealed cabinet and dust can accumulate in ducts and on the blower wheel, which generally requires professional service if it goes beyond simple exterior wipes. Water heaters primarily require internal flushing and mineral buildup removal by a technician, but their exterior can be wiped for safety and corrosion prevention.
Based on Heater Cost analysis, the frequency and depth of cleaning depends on location and usage. In dry indoor environments, exterior wipe downs and vent checks are enough most of the year. In dusty workshops or homes with pets, more frequent dusting is advised. If you notice any yellowing on insulation, rust on metal components, or persistent odors, halt DIY work and consult a professional. The objective is to remove loose dust, inspect surroundings for safety hazards, and keep vents unobstructed. Regular cleaning also helps maintain airflow, which can improve heating performance and comfort.
This section helps you recognize the right approach for each heater type and explains why a misapplied cleaning method can cause damage or safety risks. If you own a gas furnace or heat pump, never disassemble sealed parts or access flame sensors without the proper training. When in doubt, schedule a diagnostic with an HVAC technician. The guidelines here are meant to empower you to perform safe and effective maintenance while knowing when to seek professional help.
Safety basics you should know before cleaning
Safety is the foundation of any cleaning project involving heating equipment. Start by turning off power to the unit and unplugging portable devices. For gas furnaces and boilers, turn off the gas supply if you can access the service panel without opening sealed compartments. Do not use water directly on electrical components, and never operate a heater with wet hands or near damp surfaces. Wear protective gloves and keep a clear perimeter around the unit to prevent tripping hazards.
Dust and debris can be scraped loose with a dry brush or vacuum brush attachment. Avoid using aggressive solvents that could degrade plastics or coatings. If you use a damp cloth, ensure the cloth is only lightly damp and never leave water standing on components. Keep pets and children away from the area during the cleaning session. If you smell gas, shut off the gas supply and call the utility or a professional immediately. After cleaning, inspect cords and plugs for signs of wear and replace damaged parts before re powering the unit.
Adhering to local safety codes and manufacturer instructions is essential. Check the user manual for any model specific cautions and test the unit only after you have re assembled the safety covers and ensured proper venting. If you feel unsure about any step, pause and seek professional advice. The aim is to reduce the risk of electrical shock, fire, or exposure to fumes, while improving overall reliability and comfort.
Common mistakes that can damage heaters
Many DIY attempts fail because people assume all dust and grime are the same. Using too much water or applying cleaning solutions directly to electrical components can lead to short circuits or corrosion. Inadequate drying time is another common error; leaving moisture behind invites mold or rust and can affect performance. For gas heaters, tampering with flame sensing devices, burners, or ventilation pathways can create safety hazards and may void warranties.
Another frequent misstep is ignoring the condition of cords, plugs, and external housings. A cracked housing can allow dust to enter and compromise insulation. People also skip basic checks such as vent clearance, which starves the unit of air or directs hot exhaust back toward walls. Lastly, neglecting to replace or clean filters or air intake screens reduces efficiency and increases energy costs. Avoid rapidly scrubbing metal surfaces with abrasive tools that can scratch and degrade protective coatings.
If you have any doubt about a component or the correct cleaning procedure, assume a conservative stance and seek professional help. The goal is to preserve the integrity of the heater and maintain safe operation rather than chase a quick cosmetic improvement.
Cleaning a space heater a practical, step by step approach
Cleaning a small portable space heater involves exterior care, vent checks, and careful dust removal. Start by unplugging the unit and moving it to a well lit, spacious area. Use a dry microfiber cloth to wipe the housing and a soft brush to loosen dust on grills. Vacuum the vents using a brush attachment to remove loose particles from internal louvers. Avoid exposing any electrical contacts to moisture.
Dampen a microfiber cloth slightly with mild soapy water if needed to remove sticky residue, then wipe again with a dry cloth. Let all exterior surfaces dry completely before plugging in the unit again. While cleaning, inspect the power cord for nicks or cuts and replace the cord if you notice damage. If your heater has a removable filter, remove it and clean it according to the manufacturers guidance, usually with a gentle breeze or light washing that fully dries before re installation.
Finally, reassemble any panels, place the heater back in its chosen location away from walls or curtains, and test it from a safe distance to ensure no unusual noises or odors. The process typically takes 20 to 30 minutes for a basic unit, but add time if disassembly or filter care is required. For larger units or those with complex grills, refer to the manufacturer manual for interior cleaning steps. Images or diagrams can help you follow the steps more easily, so consider using the article's infographic for a visual guide.
Maintaining airflow and vent health for central systems
Airflow is the heart of any heating system. Clean filters every 1 to 3 months depending on usage and environment. When filters are dirty, the system must work harder to move air, which wastes energy and can shorten equipment life. For ducted systems, consider hiring a professional to perform a duct cleaning if you notice excessive dust buildup or restricted airflow. Outdoor vents should be kept clear of leaves, snow, and debris to maintain proper intake.
In addition to cleaning, schedule regular inspections to catch loose connections, worn belts, or faulty sensors. If you have a programmable thermostat, review its settings to ensure efficient operation and consistent temperatures. Regular maintenance also reduces allergy symptoms by improving indoor air quality. This is especially important for homes with pets or occupants with respiratory conditions.
Seasonal cleanup schedule and long term tips
Create a simple calendar that aligns with your climate and heating system. For example, check and clean exterior vents at the start of autumn, wipe down housings in winter, and perform a more thorough exterior dusting in spring. Keep a log of cleaning dates and any parts replaced, so you can track wear and schedule professional service before problems arise. By turning cleaning into a habit, you will enjoy safer operation, lower energy costs, and greater comfort during the heating season.
Tools & Materials
- Vacuum with brush attachment(Use to remove dust from vents, grills, and exterior surfaces)
- Microfiber cloths(Use dry for dust, lightly damp for residue)
- Soft-bristle brush(Gently agitate grills and louvers)
- Mild dish soap(Dilute in water for exterior cleaning only)
- Water(Used for very light cleaning; wring cloth well)
- Bucket(For soapy water if needed)
- Protective gloves(Prevents cuts and allows a firmer grip)
- Flashlight(Good lighting to spot hidden dust)
Steps
Estimated time: 30-45 minutes
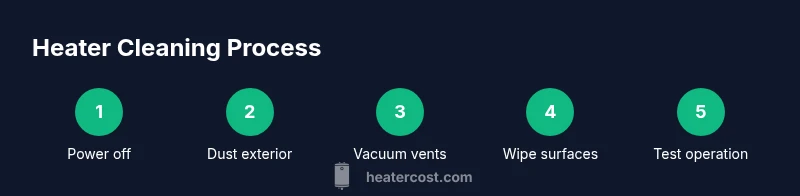
- 1
Power down and unplug the heater
Ensure the unit is completely powered off and unplugged from the outlet. This eliminates any risk of electric shock while you work and gives you access to all surfaces safely.
Tip: Wait a few minutes after unplugging to let internal components cool before touching. - 2
Move to a clean, ventilated area
Relocate the heater to a dry, well-lit workspace. This reduces the risk of knocking it into damp surfaces and makes it easier to reach vents and grills.
Tip: Place a cloth under the unit to catch dust and prevent floor staining. - 3
Dust exterior and grills thoroughly
Use a dry microfiber cloth or brush to remove loose dust from the housing and grill surfaces. Vacuum the vents with the brush attachment to dislodge embedded particles.
Tip: Do not spray liquids directly onto electrical components or into vents. - 4
Wipe surfaces with a barely damp cloth
If residues remain, wipe with a cloth dampened slightly with mild soap solution and then follow with a dry wipe. Allow all parts to dry completely before reassembly.
Tip: Avoid over-wetting; moisture on electrical parts can cause damage. - 5
Inspect cords, plugs, and safety features
Check for frayed cords, loose plugs, and damage to safety switches or grounding prongs. Replace damaged components before powering the heater back on.
Tip: Do not attempt to repair damaged cords yourself; replace them or seek professional help. - 6
Reassemble, test, and monitor
Reattach any covers, place the heater at a safe distance from walls, and plug back in. Turn on briefly to listen for odd noises and to confirm heat output is normal.
Tip: If you notice unusual smells or smoke, immediately power down and seek assistance.
Got Questions?
Is it safe to clean a heater while it is plugged in?
No. Always unplug the heater before cleaning and wait for it to cool. Cleaning while powered can cause electric shock or damage.
Never clean a heater while it is plugged in. Unplug first and wait for it to cool.
How often should I clean a space heater exterior?
Clean the exterior monthly during heavy use and at least every 2-3 months otherwise. Dust buildup reduces efficiency and can trigger safety switches.
Clean the exterior every few months, more often if you have pets or dusty conditions.
Can I use water to clean the interior of a heater?
Do not use water on internal components. Use dry methods and only a barely damp cloth on exterior surfaces when necessary.
No, avoid water on the interior; use dry methods and a barely damp cloth on the outside if needed.
When should I call a professional for central heating systems?
Call a professional if you smell gas, notice persistent soot, unusual noises, or reduced efficiency after basic exterior cleaning.
If you smell gas or hear strange noises, contact a professional right away.
What maintenance should I do beyond cleaning?
Replace or clean filters regularly, inspect ducts if accessible, and keep vents clear. A simple maintenance plan helps prevent failures and lowers energy costs.
Beyond cleaning, check filters and vents regularly to keep energy costs down.
Is it safe to clean a furnace or boiler myself?
Exterior cleaning and basic checks are usually doable, but interior cleaning or duct work should be performed by a licensed HVAC technician to avoid risk.
Interior cleaning or duct work should be done by a pro.
Watch Video
The Essentials
- Regular cleaning improves safety and efficiency
- Use the right tools and keep moisture away from electrical parts
- Know when DIY ends and professional service is needed
- Create a simple seasonal cleaning schedule to protect investment